
Occasionally I get asked, ‘how do you organise your arduino code?’ or maybe sometimes it is something a bit more specific, like I have this arduino and I want to read from some sensor and then effect some change with a motor, speaker or light. How would you organise that?
So this is my goto approach for structuring an Arduino sketch. It is a bit of head spin when you first get started. But get the hang of it, and your code becomes considerably more manageable. It makes working with more complicated sketches vastly easier. It lets you reason, update and manage parts of the sketch in isolation.
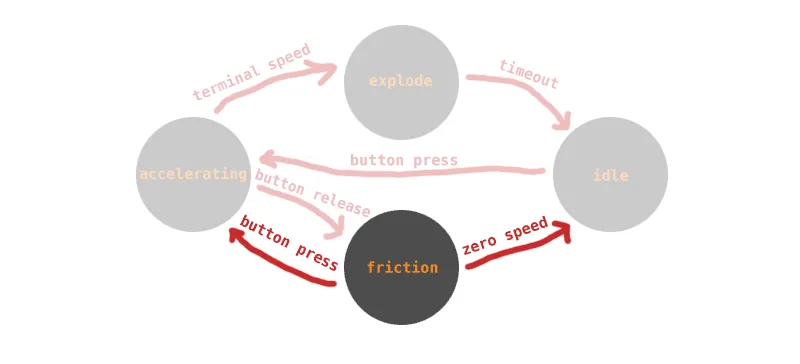
OK, I start with a crude diagram of what we are trying to build. For example, let’s say we want our Arduino to drive a strip of LEDs. It starts with a small blue light positioned at the start of the strip. When someone presses and holds a momentary switch button our blue light accelerates and starts to scroll along the strip. When they let go of the button, imaginary friction takes hold and the movement of the light slows. If someone holds the button for long enough, the blue light hits some sort of terminal velocity and ‘explodes’ making the whole strip glow a bright orange.
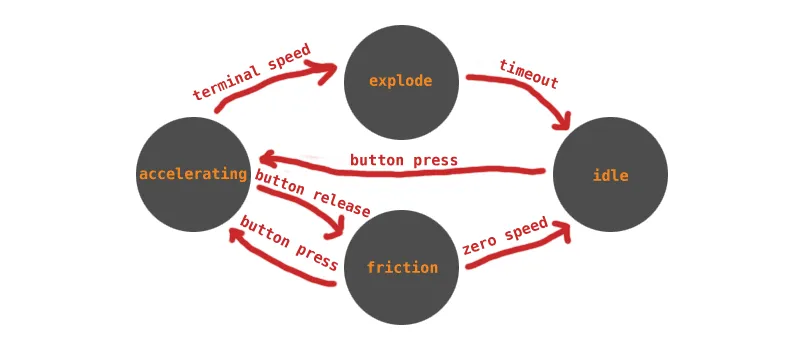
In our diagram above we have four circle modes:
- Idle is our resting mode. When we first power up the Arduino we start in Idle.
- Accelerating is where we will put our code to speed up the small blue light.
- Friction is where we will slow the small blue light down to stationary.
- Explode is what queues up the explosion animation on our LED strip.
Plus a stack of different ways to follow the arrows and transition from one mode to another. So to code all this up, we are going to rely heavily on function pointers. So you know how you can store integers, floats and that sort of thing inside a variable? You can also store entire functions, it’s kinda neat. A simple function pointer example looks a bit like this:
#include <stdio.h>
int add(int a, int b) {
Return a + b;
}
int sub(int a, int b) {
Return a - b;
}
int main() {
int (*action)(int, int);
action = &add;
printf("%d\n", action(3, 2)); // Will output 5.
action = ⊂
printf("%d\n", action(3, 2)); // Will output 1.
}
By assigning a function pointer to a variable, we can set things up so that when we ‘call’ our variable and we can have it do very different things. This is going to be helpful when we represent our circle states modes above, each will do very different things to our LED strip.
Hardware
With a clear picture of the functionality in mind, it’s time to start prototyping the hardware. In this example I used:
- 1x Arduino pro micro
- 1x Momentary push button
- 1x 10K resistor
- 5x APA102 Leds
- Breadboard and jumper wires.
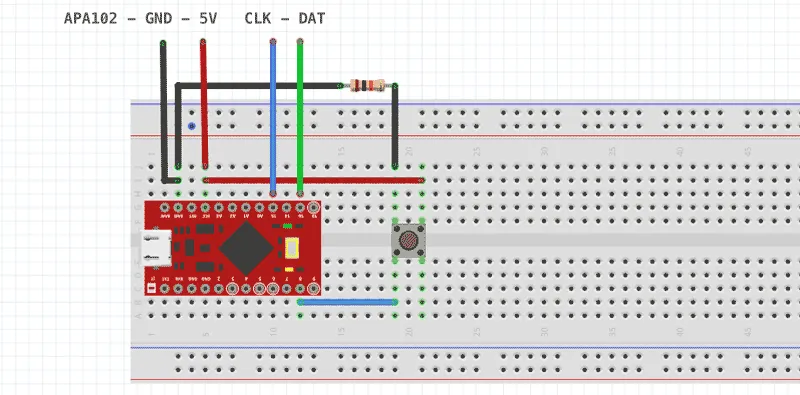
At this stage I will pull down the libraries I’m going to use with the excellent PlatformIO and knock out a very basic sketch to make sure that all the hardware is wired up and working correctly.
#include <Arduino.h>
#include <APA102.h>

// Define button.
const uint8_t buttonPin = 8;

// Define the LED strip.
const uint8_t dataPin = 16;
const uint8_t clockPin = 15;
const uint16_t ledCount = 5;
APA102<dataPin, clockPin> ledStrip;

rgb_color colors[ledCount];

void setup() {
  Serial.begin(9600);
  pinMode(buttonPin, INPUT);
}

void loop() {
  rgb_color colours[ledCount];
  for (uint8_t i = 0; i < ledCount; i++) {
    colours[i] = (rgb_color){29, 106, 177};
  }
  ledStrip.write(colours, ledCount, 4);

  Serial.println(digitalRead(buttonPin));
  delay(500);
}
This simple sketch will make all five LEDs glow blue and the Serial Monitor will output a ‘1’ when someone presses the button and a ‘0’ when released. Once i’m happy that everything is wired up nicely and working well together it is time to start blocking out the different modes for our contraption:
#include <Arduino.h>
#include <APA102.h>

// Define button.
const uint8_t buttonPin = 8;

// Define the LED strip.
const uint8_t dataPin = 16;
const uint8_t clockPin = 15;
const uint16_t ledCount = 5;
APA102<dataPin, clockPin> ledStrip;

const float acceleration = 0.000009; // pixels per millisecond squared.
const float terminalVelocity = 0.07; // pixels per millisecond.

typedef struct State_struct (*ModeFn)(struct State_struct current_state,
                                      unsigned long current_time,
                                      uint8_t button_press);

typedef struct State_struct {
  float pos;               // The current position of our blue light.
  float speed;             // The current speed of our blue light
  bool terminal;           // Has the blue light hit terminal velocity?
  unsigned long last_time; // The last time update was called.
  unsigned long started_at;// The time this mode started.
  ModeFn update;           // The current function used to update state.
} State;

/** IdleMode manipulates our blue light when at rest.*/
State IdleMode(State current_state,
               unsigned long current_time,
               uint8_t button_press) {
  Serial.println("IdleMode");
  return current_state;
}

/** AccelerateMode defines how to speed up our blue light. */
State AccelerateMode(State current_state,
                     unsigned long current_time,
                     uint8_t button_press) {
    Serial.println("AccelerateMode");
    return current_state;
}


/** FictionMode describes how to slow the blue light when we encounter
 *  friction. */
State FrictionMode(State current_state,
                   unsigned long current_time,
                   uint8_t button_press) {
  Serial.println("FrictionMode");
  Return current_state;
}

/** ExplodeMode augments our blue light when we hit a terminal velocity. */
State ExplodeMode(State current_state,
                  unsigned long current_time,
                  uint8_t button_press) {
  Serial.println("ExplodeMode");
  return current_state;
}

State state;  // The current state of our Arduino/LED strip.

/** setup is exectued once before the loop is started. */
void setup() {
  Serial.begin(9600);

  pinMode(buttonPin, INPUT);

  // Initialise the default resting state.
  state.pos = 0;
  state.speed = 0.0;
  state.terminal = false;
  state.last_time = millis();
  state.started_at = millis();
  state.update = &IdleMode;
}

/** loop iterates over and over again till the microcontroller is reset.*/
void loop() {
  unsigned long t = millis();
  state = state.update(state, t, digitalRead(buttonPin));
}
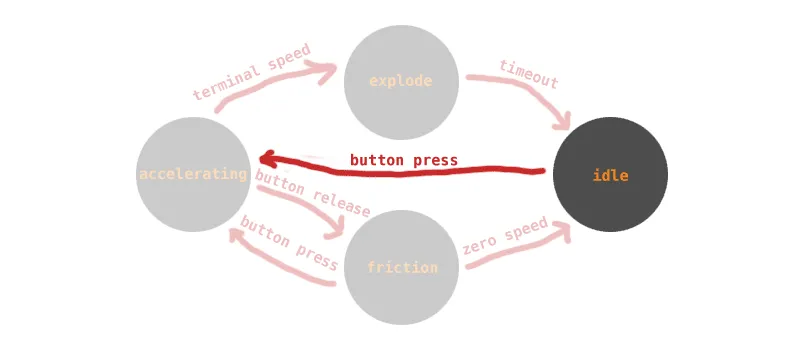
Lets start to code our modes up, we will start with IdleMode. If we go back to our original diagram we had one little arrow that leaves circle. We transition from IdleMode to AccelerateMode when someone pushes the button.
/** IdleMode manipulates our blue light when at rest.*/
State IdleMode(State current_state,
               unsigned long current_time,
               uint8_t button_press) {
  Serial.println("IdleMode");

  State new_state;
  new_state.pos = current_state.pos;
  new_state.speed = 0.0;
  new_state.terminal = false;
  new_state.last_time = current_time;
  new_state.update = current_state.update;

  if (button_press) {
    new_state.started_at = current_time;
    new_state.update = &AccelerateMode;
    return new_state;
  }

  return new_state;
}
We make a new copy of the current state, but we make sure the speed is zero since we are idle at rest. When someone presses the button we change to Accelerate mode.
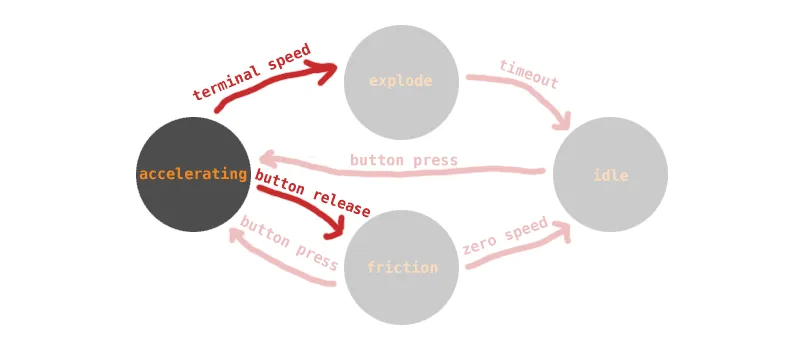
We don’t need to think about what any of the other modes are doing. We just focus on what mode we are in (Idle), what the underlying hardware has told us and if we need to follow any of the arrows to other modes. Alright let’s tackle AccelerationMode next, it’s a bit trickier.
/** AccelerateMode defines how to speed up our blue light. */
State AccelerateMode(State current_state,
                     unsigned long current_time,
                     uint8_t button_press) {
  Serial.println("AccelerateMode");

  // Update state.
  State new_state = updatePosition(current_state, current_time, 1.0);

  if (new_state.terminal) {
    new_state.started_at = current_time;
    new_state.update = &ExplodeMode;
    return new_state;
  }

  if (!button_press) {
    new_state.started_at = current_time;
    new_state.update = &FrictionMode;
    return new_state;
  }

  return new_state;
}
Again we create a copy of the current state, then update the position and speed of the blue light. We do all this with the call to updatePosition, we’ll dig into that in a minute. Then we create the rules for following our arrows to the other modes. This time we have two. If we are going faster than our terminal velocity, switch to Explodemode. If someone lets go of the button we switch over to FrictionMode. Otherwise we just stay in AccelerateMode. Since we are accelerating our we need a few bits of high school physics to update the speed and position of the blue light. I defined this in a little helper method called updatePosition. The argument direction expects either 1 or -1 to be supplied, that way we can reuse this method for both the AccelerateMode and the FrictionMode.
State updatePosition(State current_state,
                     unsigned long current_time,
                     int direction) {
  unsigned long deltaT = current_time - current_state.last_time;

  State new_state;
  new_state.speed = current_state.speed + (direction * acceleration * deltaT);
  new_state.pos = (current_state.pos + current_state.speed
                  + (0.5 * direction * acceleration * deltaT * deltaT));
  new_state.terminal = (new_state.speed > terminalVelocity);
  new_state.last_time = current_time;
  new_state.started_at = current_state.started_at;
  new_state.update = current_state.update;

  return new_state;
}
OK, with all that completed, friction mode just falls into place. The only thing we need to be mindful of is to correctly reverse the acceleration by supplying -1 to update position:
/** FictionMode describes how to slow the blue light when we encounter friction. */
State FrictionMode(State current_state,
                   unsigned long current_time,
                   uint8_t button_press) {
  Serial.println("FrictionMode");

  State new_state = updatePosition(current_state, current_time, -1.0);

  if (new_state.speed < 0.0) {
    new_state.started_at = current_time;
    new_state.update = &IdleMode;
    return new_state;
  }

  if (button_press) {
    new_state.started_at = current_time;
    new_state.update = &AccelerateMode;
    return new_state;
  }

  return new_state;
All that is left for our modes is ‘explode’, we will use 1.5 seconds for the timeout before dropping back down to idle mode again:
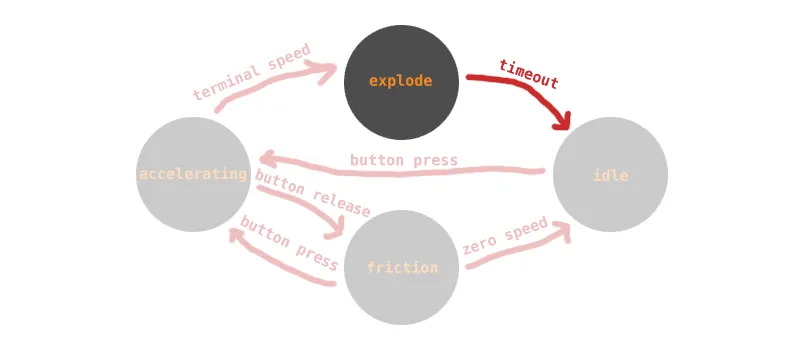
/** ExplodeMode augments our blue light when we hit a terminal speed. */
State ExplodeMode(State current_state,
                  unsigned long current_time,
                  uint8_t button_press) {
  Serial.println("ExplodeMode");

  unsigned long deltaT = current_time - current_state.started_at;
  if (deltaT > 1500) {
    current_state.update = &IdleMode;
    return current_state;
  }

  return current_state;
}
We are almost done. All that’s left is to render the state of our contraption to the APA102 LED strip. We do this each time we iterate through the main loop of the sketch.
/** render displays the current state of the contraption on an APA102 strip.*/
void render(State current_state) {
  // render.
  rgb_color colours[ledCount] = (rgb_color){0, 0, 0};
  if (state.terminal) { // Display the 'exploded light'
    for (uint8_t i = 0; i < ledCount; i++) {
      colours[i] = (rgb_color){220, 127, 31};
    }
    ledStrip.write(colours, ledCount, 8);
  } else { // Display the position of the blue light.
    colours[(uint8_t) (state.pos) %5] = (rgb_color){29, 106, 177};
    ledStrip.write(colours, ledCount, 4);
  }
}

/** loop iterates over and over again till the microcontroller is reset.*/
void loop() {
  unsigned long t = millis();
  state = state.update(state, t, digitalRead(buttonPin));
  render(state);
}
Example:
Source Code:
Comments:
You can join the conversation on Twitter or Instagram
Become a Patreon to get early and behind-the-scenes access along with email notifications for each new post.
Hi! Subconsciously you already know this, but let's make it obvious. Hopefully this article was helpful. You might also find yourself following a link to Amazon to learn more about parts or equipment. If you end up placing an order, I make a couple of dollarydoos. We aren't talking a rapper lifestyle of supercars and yachts, but it does help pay for the stuff you see here. So to everyone that supports this place - thank you.