
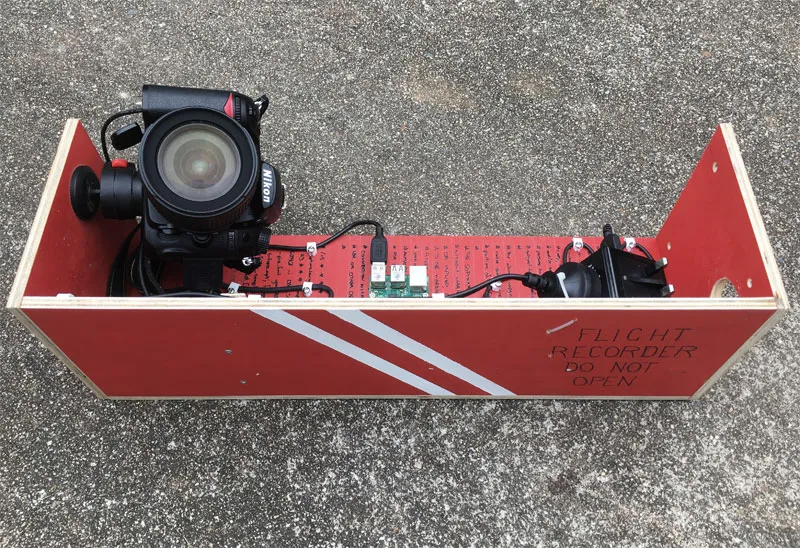
So a while ago, I made a ‘flight-recorder’ for one of my curiosities. It hung from the ceiling and recorded a time-lapse; the fate of a plant as it resided within a ‘Marsarium’ with simulated martian soil and atmosphere. It also displayed a video loop alongside the marsarium, giving visitors a quick overview of the entire ‘mission’.
This guide steps you through the process of creating your own Raspberry Pi time-lapse rig. One that updates a video loop each day with the latest time-lapse photos.
Materials
You will need a Raspberry Pi and Micro SD Card, depending on how long you plan on running your time-lapse, you might want to get 32GB or larger. I wanted to capture in fairly decent quality, so I commandeered my DSLR camera rather than using a webcam. When looking for suitable cameras you are going to want a digital camera that is supported by gphoto2. It will need to have some sort of USB output and the ability to power it off the mains (you don’t want your camera to go flat after a day of capturing).
Wire your camera to one of the USB ports on the Raspberry Pi. Plug the camera into the mains, and switch it on. Bootstrap your Raspberry Pi, power it up and log in.
Capturing Images
gphoto2 is a great piece of open source software for controlling digital cameras from the command line. To get the photos from the camera to the Raspberry pi:
$ sudo apt-get install gphoto2
$ gphoto2 --set-config capturetarget=1 --capture-image-and-download
This installs gphoto2, then instructs the camera to take a picture and download it to your Pi. Seeing as the output resolution of my timelapse video is 1080p, I downsample the image as it is captured:
$ sudo apt-get install imagemagick
$ gphoto2 --set-config capturetarget=1 --capture-image-and-download | grep Saving | cut -d ' ' -f 4 | xargs -I@ convert /home/pi/@ -resize 1920x1080! /home/pi/@
Building Time-Lapse videos
To stitch the individual photos into a single video we need to install ffmpeg, on the Raspberry Pi we compile this from source:
$ git clone git://git.videolan.org/x264
$ cd x264
$ ./configure --host=arm-unknown-linux-gnueabi --enable-static --disable-opencl
$ make
$ sudo make install
$ cd ..
$ git clone https://github.com/FFmpeg/FFmpeg.git
$ sudo ./configure --arch-armel --target-os=linux --enable-gpl --enable-libx264 --enable-nonfree
$ make
$ sudo make install
Now my camera generated files like DSC_0001.JPG, DSC_0002.JPG, … you will need to look at what is coming off your camera and adjust the following command accordingly. In the example below the first image is /home/pi/DSC_0152.JPG, ffmpeg will grab all the sequentially numbered files after that and encode it into the video /home/pi/t-lapse.mp4
$ ffmpeg -y -f image2 -start_number 0152 -i /home/pi/DSC_%4d.JPG -vcodec libx264 -pix_fmt yuv420p /home/pi/t-lapse.mp4
For my video loop I wanted to include an introduction video before the time-lapse so I concatenated an intro film.
$ vim /home/pi/filelist.txt
And listed the two videos I wanted concatenated
file ‘/home/pi/intro.mp4’
file ‘home/pi/t-lapse.mp4’
Now I can use the following ffmpeg command to join the two videos together:
$ffmpeg -y -f concat -safe 0 -i /home/pi/filelist.txt -c copy /home/pi/Videos/mission-log.mp4
Displaying Time-Lapse videos
I used Adafruit’s video looper to display the time-lapse captured by the flight recorder:
$ cd /home/pi
$ git clone https://github.com/adafruit/pi_video_looper.git
$ cd pi_video_looper
$ sudo ./install.sh
$ sudo vim /boot/video_looper.ini
Update the video_looper.ini configuration file to read from a directory:
#file_reader = usb_drive
file_reader = directory

Set the video directory:
# Directory file reader configuration follows.
[directory]

# The path to search for movies when using the directory file reader.
path = /home/pi/Videos
When the Raspberry Pi is booted it will automatically start the video looper full screen and start playing any videos that are in /home/pi/Videos
Scheduling the Activities
Create a script ‘blackbox.sh’ that can be used to rebuild the time-lapse and let video looper know that there is a new video for it to display.
$vim /home/pi/blackbox.sh
This file contains everything we need to rebuild our mission-log video, it takes all the images in /home/pi and stitches them together with any intro video you might have. It saves it all as a single file /home/pi/Videos/mission-log.mp4
#!/bin/bash
export LD_LIBRARY_PATH=/usr/lib
supervisorctl stop video_looper
/usr/local/bin/ffmpeg -y -f image2 -start_number 0152 -i /home/pi/DSC_%4d.JPG -vcodec libx264 -pix_fmt yuv420p /home/pi/t-lapse.mp4 > /home/pi/ffmpeg.txt 2> /home/pi/ffmpeg.err
/usr/local/bin/ffmpeg -y -f concat -safe 0 -i /home/pi/filelist.txt -c copy /home/pi/Videos/mission-log.mp4
supervisorctl start video_looper
Finally we will use cron to schedule all the rebuilding activities. Create a file that we can use to tell cron when we want certain things to happen:
$ vim /home/pi/cronfile
We capture a picture every 20 minutes from 8am till 8pm and rebuild the video loop each night at 11:02pm.
0,20,40 8-19 * * * cd /home/pi && gphoto2 --set-config capturetarget=1 --capture-image-and-download | grep Saving | cut -d ' ' -f 4 | xargs -I@ convert /home/pi/@ -resize 1920x1080! /home/pi/@
2 23 * * * /home/pi/blackbox.sh
Tell cron to use this cronfile for the superuser’s schedule
$sudo crontab /home/pi/cronfile
That’s it, your Raspberry Pi is now a self contained ‘flight-recorder’ for capturing time-lapses and displaying them on a monitor as a continuous loop. You can use it to make videos like this:
References
- https://www.gphoto.org/
- https://www.ffmpeg.org/
- https://trac.ffmpeg.org/wiki/Concatenate
- https://www.imagemagick.org/script/index.php
- https://www.jeffreythompson.org/
- https://learn.adafruit.com/raspberry-pi-video-looper/overview
- https://www.adafruit.com/product/3386
Comments:
You can join the conversation on Twitter or Instagram
Become a Patreon to get early and behind-the-scenes access along with email notifications for each new post.
Hi! Subconsciously you already know this, but let's make it obvious. Hopefully this article was helpful. You might also find yourself following a link to Amazon to learn more about parts or equipment. If you end up placing an order, I make a couple of dollarydoos. We aren't talking a rapper lifestyle of supercars and yachts, but it does help pay for the stuff you see here. So to everyone that supports this place - thank you.